Waxing Plastic Frames
Bees only accept waxed foundation


Page F4. Home page >
Aetiology of frame distortion Replacing comb
Bees will not build comb on plastic foundation unless it is coated with a thin layer of wax.
Whilst all-in-one plastic frames have become unavailable in the UK, plastic foundation is still sold.
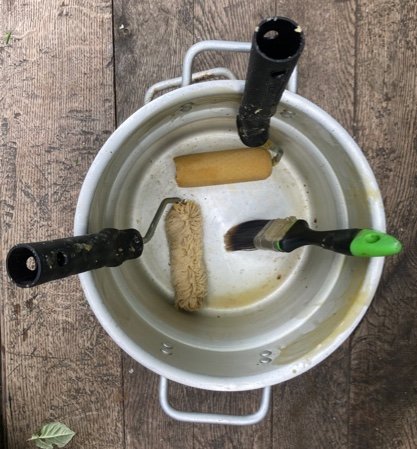
Coating a frame with wax can be achieved by: rolling, painting rubbing, dipping.
Waxing with a roller

American beekeepers expound various methods for waxing frames:
Rub with a beeswax candle
Wax only the middle of the frame. No need to wax the whole surface.
Spray with sugar syrup
Spray with a solution of propolis.
Apply a light coating with a roller
Using sponge brushes
These American methods don’t work for me, possibly because English bees are less prolific. I have to apply just the right amount of wax. Even if you get it right, the bees only draw them (make comb) in a honey flow. At other times I recommend using wax foundation.
It isn't easy to apply the perfect amount of wax. Fifty grams per frame is about right. Ten sheets of Modified Dadant shallow foundation weigh 556 grams.
Some foundation is sold already waxed. The layer is usually too thin; wax it some more.
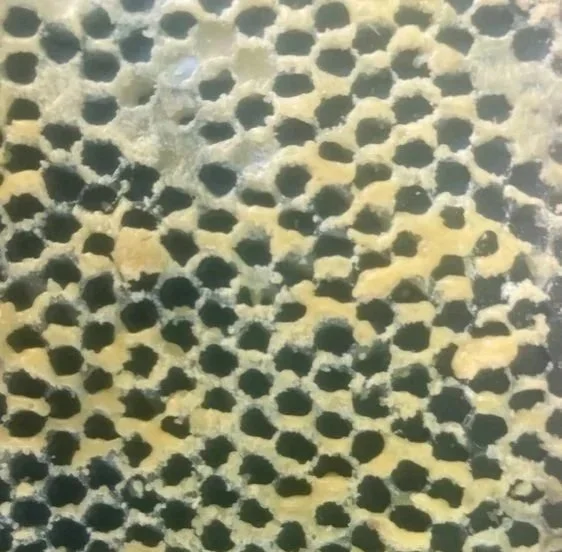
Without decent waxing, bees make sculptures. If the hexagonal pattern is obscured, they are reluctant to draw comb, and you waste wax. Get it right; all your combs will be flat as billiard tables. The crucial thing is to coat the tops of the cells adequately. The larvae happily grow on a bed of uncoated plastic.

The consequence of inadequately waxing

Before waxing check the frames are are n’t cold. Picture shows some balanced near a radiator.

If it is too cool the wax does not flow. The bees will spurn this frame.
A natural concern is that if you wax black foundation too enthusiastically, the cells will have white blobs at the bottom. Hence, the temptation is to wax them too thinly.
Applying Wax
The Aetiology of Plastic Frame Distortion
Heat Deflection
Heat deflection temperature (HDT) is the temperature at which a material distorts 2.5 mm and depends on thermal expansion and thermal conductivity. Polypropylene (PP) comes in various forms, so it isn't easy to interpret the figures. A typical HDT for pure PP is 95 deg. C. However, the standardised way of measuring HDT may not accurately reflect what happens with plastic frames. For instance, the softening of PP begins at 82 degrees C.
Stress from wax wax-changing state
The expansion of beeswax is 10% when it melts at 64 °C.
Permanent Distortion
If the stress on a frame is greater than the yield point, the deflection becomes permanent (like an overstretched rubber band). Here is an explanation of yield strength.
For rolling, I recommend using a 4” roller, a woolly, or sponge one, and perhaps a weeny one.
Heat the wax in a Bain-Marie. The correct temperature for application with a roller is tricky. To avoid warping, use wax at about 70 °C. At lower temperatures, it solidifies too soon and results in an opaque layer. Too hot, and the foundation may deform. Having had some disappointments, I found heating up to 85 °C. was okay.
While waxing with a roller, some advocate putting a piece of wood under the (all in one) frames to reduce the chance of warping; I don’t find it helps.
Brushing and rubbing wax are safe.
Brushing is slow, but achieves the best result.
Try these techniques
Using a fluffy roller, put it on the frame abutting the top bar and then push it along with a little downward pressure so a tide of wax flows in front. When you reach the end, quickly pass over the lower part of the frame, trying not to overlap the earlier application. I do not do a second pass but roll a bit more wax here and there, paying particular attention to the corners. Initially, the coating looks opaque but becomes translucent as it cools. Watch a video on using a fluffy roller.
Using a sponge roller, move it gently and rapidly back and forth over the frame, paying attention to the edges and corners. Using a sponge results in a more uniform waxing than using a fluffy roller. Concentrate on putting wax on the surface of the hexagons, not on the bottom of the cells. Watch a video by Kamon Reynolds.
Using a paintbrush can cause globs of wax, but with care, it is possible to coat just the top of the cell walls, which is all that is required. Apply a light coating. With the paintbrush nearly horizontal, this is relatively slow but requires little wax (20 grams).
You could try a foam brush (the chap’s wax is boiling, yikes. Note, he did not wax one edge of the foundation).
Rubbing with a stick of wax is simple. Melissa’s waxing is inadequate but get the principal.
Dip the foundation into a 4 to 6-inch layer of wax that is floating on hot water. The foundation may go mouldy.
Double waxing: first apply a thin layer of wax as above. Allow to cool and use a brush to carefully cover the upper rim of the cells. So far (late 2025) I’m seeing good results, but it’s too early to be certain.
Double waxing: first roll with a thin layer, allowed to dry, then wax with a brush. excellent result.

Rubbing with a stick of wax works for some people. But it can be heavy on wax and barely coats the upper edges of the cells.

A big brush is quicker. A brush with fine hairs makes it a little easier to coat only the tops of the cells.
-

Not waxed
Must be waxed before use
-

Generously waxed
There is slight excess wax which they use to start drawing comb. Once they start they usually continue.
-

Not enough wax
Evenly coated but with insufficient wax. Acceptance will be poor.
-

Uneven waxing
it could be some surface bloom or too much wax. In both these situations comb will not be drawn.
-

Surface bloom
When wax is cooled slowly, over a period of months, some oils rise to the surface and crystallise, forming a matt surface that looks like mould. It can be resurrected by heating to 39 °C. Whilst this removes the bloom bees prefer the tops of the cells to be re-waxed.
-

Well drawn comb
Well, drawn. Note small wax residues on the base of the cells.
-

Pollen packed in comb
Every plant produces a distinctive coloured (and shaped) pollen
-

Poorly waxed
Due to wax or comb being too cold
-

Waxed using a paint brush
This technique requires a little less wax.
Comb Replacement
To get the greatest benefit from black foundation replace it as soon as it becomes darken, and it is difficult to see the bottoms of the cells. This arises when a comb is used for brood all summer. Most beekeepers replace comb every three years. The simplest way is to gradually shunt the old frames to the edge of the brood nest and then remove them. With a populous colony, get them drawn by weaving empty frames between brood frames. Done too soon, and the colony may swarm. During a dearth, temporarily removing the supers, replacing them with a box of foundation and feeder, works well. More radical methods are a Bailey change, a Shook swarm, or a Demaree.
Bailey comb change
This manipulation requires a Bailey board, which offers the same functionality as a Swarm Trap. The brood is put in the bottom box with a queen excluder above it. The queen goes in the top box with frames of foundation. Their regular entrance is closed to prevent pollen from accumulating in the bottom box. Feed the colony with syrup. Gradually remove the old frames. One month later, return the hive to its standard configuration.

Shook Swarm
This can be used for comb replacement, and varroa control.
A shook involves shaking bees into a box of fresh frames and destroying the old combs. This manipulation is tough on the bees. The colony must be strong; eight frames of brood are cited for bees in wooden hives, but really, it should be eight frames three weeks ago with plenty of bees crawling on top of the frames. It is a strange illusion that a hive can look full of bees when they are on the combs, but when tipped out, the quantity is miserly. Shook when the weather forecast is favourable; better to do it too late than too soon in the year. If you are fortunate to have some Oil Seed Rape growing nearby, leave off shooking until it flowers.
Consider feeding with syrup in March and shooking in mid-April.
A colony in a poly hive should have 10 to 12 frames of brood by April; so shook before they swarm.
How to do a Shook swarm
Remove 4 frames from the centre of the box so that you can shake the bees in easily. At the start, find the queen and put her somewhere safe. If you can’t find her, cross your fingers and throw her in with the rest of the bees. In my limited experience, she is unlikely to come to any harm; if you throw the queen in, I recommend, for your psychological well-being, you place a second empty box on top to act as a funnel; spray its inside walls with water, so the bees do not crawl up and out of the box. A band of smooth duct tape around the inside of the box makes it more difficult for them to escape. also helps When a queen lands on a soft carpet of bees, she is bound to be okay. If the old frames contain a lot of nectar, the bees in the box will become gooey and less prone to fly up. There are a few casualties and apparently there is a small risk that they will ball the queen.
Bees dislike being in an empty box, just as we hate moving into a house without furniture. A queen excluder (QE) must be put above the floor to keep them from absconding. They will abscond if you don’t!
The colony should be fed and will rapidly draw comb, and the queen start laying at a phenomenal rate. Check on them three days later and remove the QE. If they have not made comb, something is wrong.

Hive body ready for a shook swarm. Note the slotted steel QE above the floor.
Shook Swarm - YouTube video
For varroa control Sublimate or trickle oxalic acid in the first week. Alternatively use a frame of unsealed brood. When the brood is sealed destroy it.
Demaree
I don’t recommend a Demaree to replace combs unless the colony is large and there is a nectar flow. Although, I’ve not tried it!
You may be interested to read about drawing comb and How bees produce wax
Remove the supers in a dearth
Clear the supers of bees, then seal these boxes and keep them safe. Place a box of foundation on top of the brood boxes and feed thin syrup.
This is the end of the website section about frames

Page F4