Manipulations Swarm Control
Avert a swarm


Abridged version Dynamics Ground rules Methods
Basic Assessment: Give an elementary account of one method of swarm control
Swarming is the bees’ mode of reproduction. Half the bees and the queen leave to form a new colony. From a beekeeper’s perspective, losing bees in a swarm is tantamount to criminals fleeing the police. If the criminal’s car is far ahead, they may get away. To prevent this, the police must make a roadblock or roll a strip of spikes across the road that puncture the car’s tyres. The roadblock and spikes are like the manipulations beekeepers perform to prevent their bees from flying away.
This page describes some ways to prevent swarming when queen cells (QC) are already present. I think Splits and Modified Snelgrove 2, are good, as is the Demaree, which is really better suited to prevention. However, as a first step, many people learn the Pagden Artificial Swarm because that is what they’re taught on their association beginners practical course. That’s okay, start with that. Before describing methods, I explain the principles behind swarming and its control. Note that swarm prevention is different; it describes methods to use before QC arise.
Colony size — honey volume — Swarming
A colony has to be a specific size before it can make honey, which is also true of swarming, although swarming can arise because the bees are living in a small cavity (less than 40 litres). A colony needs a surplus of bees beyond those required to care for the brood, just as a family can only go on a foreign holiday when it earns considerably more than its childcare costs. In the graph below, I’ve depicted this transition with a red line. The accumulative area under each curve and above the red line in the main flow (when there are plenty of flowers) corresponds to how much honey a colony produces. There are five scenarios:
Colony population time series graph
Orange — where both portions of a Split are united for the main flow.
Green — Split.
Purple Swarm — If a large colony swarms in early April, there is hope of a small harvest.
Pale green — a portion of a split that has insufficient resources to recover or is ill.
Grey/black — no swarming or manipulation.

The graph illustrates what happens when the colony population (shown in thousands) dive bombs due to swarming, colony manipulation or poisoning. It takes a minimum of 21 + 7 days for an egg to be capable of becoming a forager; a month before mid-June. In the build-up, the colony re-invests its surplus into creating more bees, and by mid-June, it may have no stores and many hungry mouths to feed. If the main flow is late, they starve. A colony that swarms in July should still have enough bees to produce a surplus. Sometimes in England, with favourable spring weather, they produce a good spring crop.
Colony dynamics and swarm control / swarm management

Please refer to Figure 1.
The red boxes indicate factors that can be adjusted to scupper the colony’s attempt to swarm, if only by a few days.
Sufficient brood
Sufficient foragers
Young bees
At least one queen cell
Presence of a queen.
Manipulations
The illustrations usually display the final position of the boxes.
Demanding - you must find the Q and reduce QC
Pagden Artificial swarm.+ Heddon
Simpler
Ground rules
1. Never kill a spare queen, unless she heads an aggressive colony or is a drone layer. Put her in a small nuc with bees, stores and emerging brood (which may not be straightforward to determine). If the frame is laid in a concentric pattern, it is the furthest brood from where she is laying. The Q may be helpful later.
2. As far as possible, always leave the frames in the order you found them. Failing this, put brood centrally boarded by frames of pollen, comb, nectar, and stores. A box must contain a full complement of frames.
3. The parts of a split must be at least one meter apart, with entrances facing opposite directions.
4. Suit the manipulation to the situation. Early in the season, an artificial swarm or split are strong enough to block the swarming urge, but at the cost of setting the colony back a great deal. In July, such a robust manipulation would weaken the colony before winter. A Demaree defers swarming for a little while.
6. If a portion lacks foragers, check it has some stores. After 24–48 hours, start feeding with syrup.
7. Put nucs in the shade.
8. After 48 hours, check that a nuc/hive that has moved away has enough bees.
9. If there are loads of QC at the outset, and you want to use some to perform splits, use a fat open or closed queen cell (depending on whom you talk to). The rationale for using an open cell is to ensure that you don’t choose a QC that is empty or dead, and it enables one to predict when the queen will emerge. If you use open cells, consider whether there are enough bees and pollen to provide the QC with sufficient nutrition. It may be wise to reduce the number of cells and open brood.
10. Manipulations require attention to detail. If a manipulation requires reducing QC to one, and you don’t, all your hard work will be undone.
12. I don't mean to insult your intelligence; plan what equipment you’ll need before you start. Usually, in addition to a nuc or new hive, it is helpful to have one or two empty boxes (to sort frames) and a couple of spare hive stands (to make lifting easier).
13. If a queen is removed from a hive, and you wish to re-introduce her a few days later, The emergency QC must be removed first. A bee’s short-term memory is less than 12 hours, so this cut-off should be safe.
14. Young queens, move fast and are called “runners”. You will be lucky to see one.`
15. Returning a young queen to a hive — only release her in to the dark space between two frames. Do otherwise and she may fly. Destroy QC before you return her.
16. Bees are slow drawing wax on plastic frames in the spring, without a nectar flow. This can cause a block to expansion. Use drawn comb or wax foundation early in the year.
17. Check for brood 28 days after a manipulation. There is often nothing to see, so be patient.
Having a marked queen is helpful when performing manipulations
Marking the queen
A young Q will run around, making it almost impossible to find her. But keep your marking pen to hand.
Marking involves dabbing a spot of paint on her thorax.


The syringe device is for catching the queen and marking her. The device with the portcullis is handy for transferring the queen (if you can’t handle her) into a travel/introduction cage.
Timing is critical when it comes to manipulations.
Thorne sells this little device. Turn the dial, and rather like an old-fashioned set-square for maths, you can read off what happens when.
Combine this with looking at a brood table.

Artificial swarm (AS) / The Pagden method
This is the most popular method around my way. It prevents swarming 100% IF DONE CORRECTLY.
The Q stays home, with no QC in a box of combs along with the supers. She must have some comb.
The brood is moved at least one metre away, with the entrance facing away from the home hive. Consequently, the foragers fly home.
The portion moved away must make a Q, so destroy all but one QC. But you may want to leave two:
When one QC is left, there is a risk that it dies. This is unlikely. If two remain, there is a significant risk that they swarm on the first Q. However, if two QC are close together on a comb, and they look the same age, leaving two is less risky. Culling QC is easier using the Modified Snelgrove 2.
After a 24-hours, this portion has lost all its foragers, so feed it thin syrup.
Received wisdom is that you leave a fat larva rather than a closed QC. The reasoning is misty. It may:
Reduce the chance that they will swarm on the first Q that emerges?
Smaller risk of damaging the QC when the frame is returned to the hive.
Increase the chance that the Q is from day four brood.
Able to accurately date the age of the subsequent QC.
Establish that the closed QC will be alive when the cell is sealed; bees are unlikely to seal a dud QC.
When I did AS, I selected a nicely patterned, closed QC, and got away with it. Some closed QC look outwardly okay, but only contain a maggot. Duds are presumably caused by poor nutrition.
Vertical Pagden: the moved away portion is put at the top of the stack and separated from the supers and Q using a manipulation board with an area of mesh and upper entrance facing away from the home hive entrance.

The part that is moved away has to make a new Q but has plenty of young bees.
You may hear of a modified artificial swarm called a Heddon. It is unnecessary but works like this: One week after the first manipulation, the “mobile home” portion is moved 180 degrees to the other side of the home position (where the swarm resides). This means more flyers boost the swarmed portion.
The portion at the home position is not equipped to look after the queen or any brood. So this portion dwindles. The moved away part has no fresh pollen coming in. House bees are upgraded to become foragers, which are ineffective and die prematurely. Despite these caveats, a large colony copes well.
Splits
The queen is placed in a nuc with 1 - 4 frames of mostly sealed brood. The nuc is moved away and placed in the shade.
The home colony is left to re-queen. It should make a decent Q as it has almost the full resources of the colony. At the outset reduce the QC to one open QC. After 6. - 7 days, cull any more QC that have formed. The new queen should lay with a bang. If done vertically, the manipulation board is set to mesh.

A split performed vertically
B - 4 denotes all brood except 4 frames
4B four frames of brood
MB manipulation board
Wakeford (as described by Peter Patterson)
Remove the queen
Destroy all the QC and charged cups.
Seven days later, destroy all the QC except for one.
Modified Demaree
This method works by separating the Q from the brood. It does not disrupt the colony hugely, and is most suited to prevention rather than control. For control, the bottom box is separated from the brood box, by a QE, two supers, and a manipulation board. The Q on her frame, that contains no QC, goes at the bottom and all of the brood at the top. Cull the QC at the start of the manipulation and 7 days later. Since the manipulation lacks power, it may need to be repeated.
The quandary is whether it is possible to raise a queen in the top brood box. I suspect not. The one time I tried, and left the QE revealed on the manipulation board, they swarmed. To be definitively effective, open the top rear entrance and trap bees at the top of the hive, whereupon the Demaree becomes a Vertical Pagden. If the flying bees are repeatedly drained off the top box, the QC do not need to be culled, just like a Snelgrove 1, and accordingly, the top box bees probably require feeding.
Problems with the Demaree
Unless you provide an entrance, drones get trapped up top. If they can’t wait to be released, they prefer to kill themselves by getting their heads stuck in the QE, If they don’t fancy doing that, they die anyway,
Ensure that you avoid putting some open brood or eggs in the supers.
It is prudent, but not necessary, to find the queen. If you cannot find her, shake all the bees into the bottom box, like doing a shook swarm. Alternatively, throw them on a ramp (covered with a sheet) that leads to the entrance.
If the bottom box does not have much drawn comb, the queen will not lay with a bang.
The bottom box can become congested. A queen can fill a box with brood in several weeks.
Increased brood can result in dangerous varroa levels.
To set it up you’ll need space around the hive since it involves making a new brood box, a box for the queen. You’ll need fresh drawn and undrawn comb, stores, box for old comb, brood frames, a manipulation board, and possibly a new floor, and a clean queen excluder.
The hive can become congested with stores. I have never had a problem. Perhaps because, if necessary, I put a super above the upper box which gives them space to put stores.
Modified Snelgrove ii
Snelgrove’s method 2 is what earns him a bad name, as it is incredibly complicated. It involves multiple steps, opening and closing entrances on his board. Wally Shaw has distilled its essence and concocted an elegant manipulation. There is no need to find the queen at the start. At the second stage she is easier to find since the flying bees have left the brood box.
Put three frames of brood in a nuc and place this at the home position. The frames can be mostly sealed brood, must not contain any QC, but must contain some eggs. The “swarm” portion is placed at the home position. Since the flying bees leave the moved away portion, the workers break down all the QC.
After 9 days (12 days at the latest) destroy the QC in the nuc and immediately return the queen. She does not need to be protected.
Modified Snelgrove performed horizontally


Modified Snelgrove performed vertically

Swarm Trap

The Q is trapped beneath the excluder, stopping her from swarming. As the virgin queens emerge, they fight until only one or the old queen survives. Usually a virgin wins.
Leave the colony alone for 28 days. After this, reverse the entrances so that the Q can go out to mate.
If there is too much brood to fit in one box, put surplus frames above the Swarm Trap. Kill all the QC on these frames, and repeat after six o; seven days.
Paradise Honey extols this device as a revolutionary innovation. It isn’t. A Bailey board is much the same. The trap has an entrance reducer, not just an entrance. It is not available (in the UK) for either Nationals, or Langstroth (2026), but if you have basic wood working skills it is easy to make.
With the previous Paradise trap design, the concept was that if the brood was in one box, the trap was left in the hive as a regular QE. But the device kept falling apart. The new design can be used in the same way. The colony seems to expand normally. The Paradise device sometimes engenders gazillions of propolis on its undersurface.
To control swarming, when any QC arises no thought is required, shut the hive entrance and open the upper entrance. Job done. It works well and can be used as your sole method of swarm control. It’s quick and no fuss.
Split without finding the queen

The brood boxes are separated, and QC destroyed. Place an equal amount of brood in each box. Both must contain eggs. One box is left on the home site. Four days later, check which box has QC and which one has eggs.
Then move the box that contains eggs further away. Transfer some brood frames from the moved away portion to the home hive, so that the manipulation resembles a standard split.
The home portion has no queen and may react as if it is in emergency mode. However, you can never be sure with bees, so reduce the QC.
Straddle stone - the Derek M
A bedsheet is draped over an upturned brick. The hive and brood frames remain at the home position and placed on a hive stand.
A square piece of plywood is placed on top of the brick. Hence, my name for this manipulation.
Shake all the bees onto the sheet. The bees gather under the plywood except the flyers who return to the home hive.
Site a new hive and combs somewhere else in your apiary.
Remove the plywood and adherent bees and shake them into the fresh hive. Any remaining flyers return to the home position.
The final position is that the brood and fliers are at the home position, and the swarm containing the queen and young bees, just as nature intended. The QC at the home site must be culled except one.

Key:
fb flying bees
B brood
hb house bees
Q queen
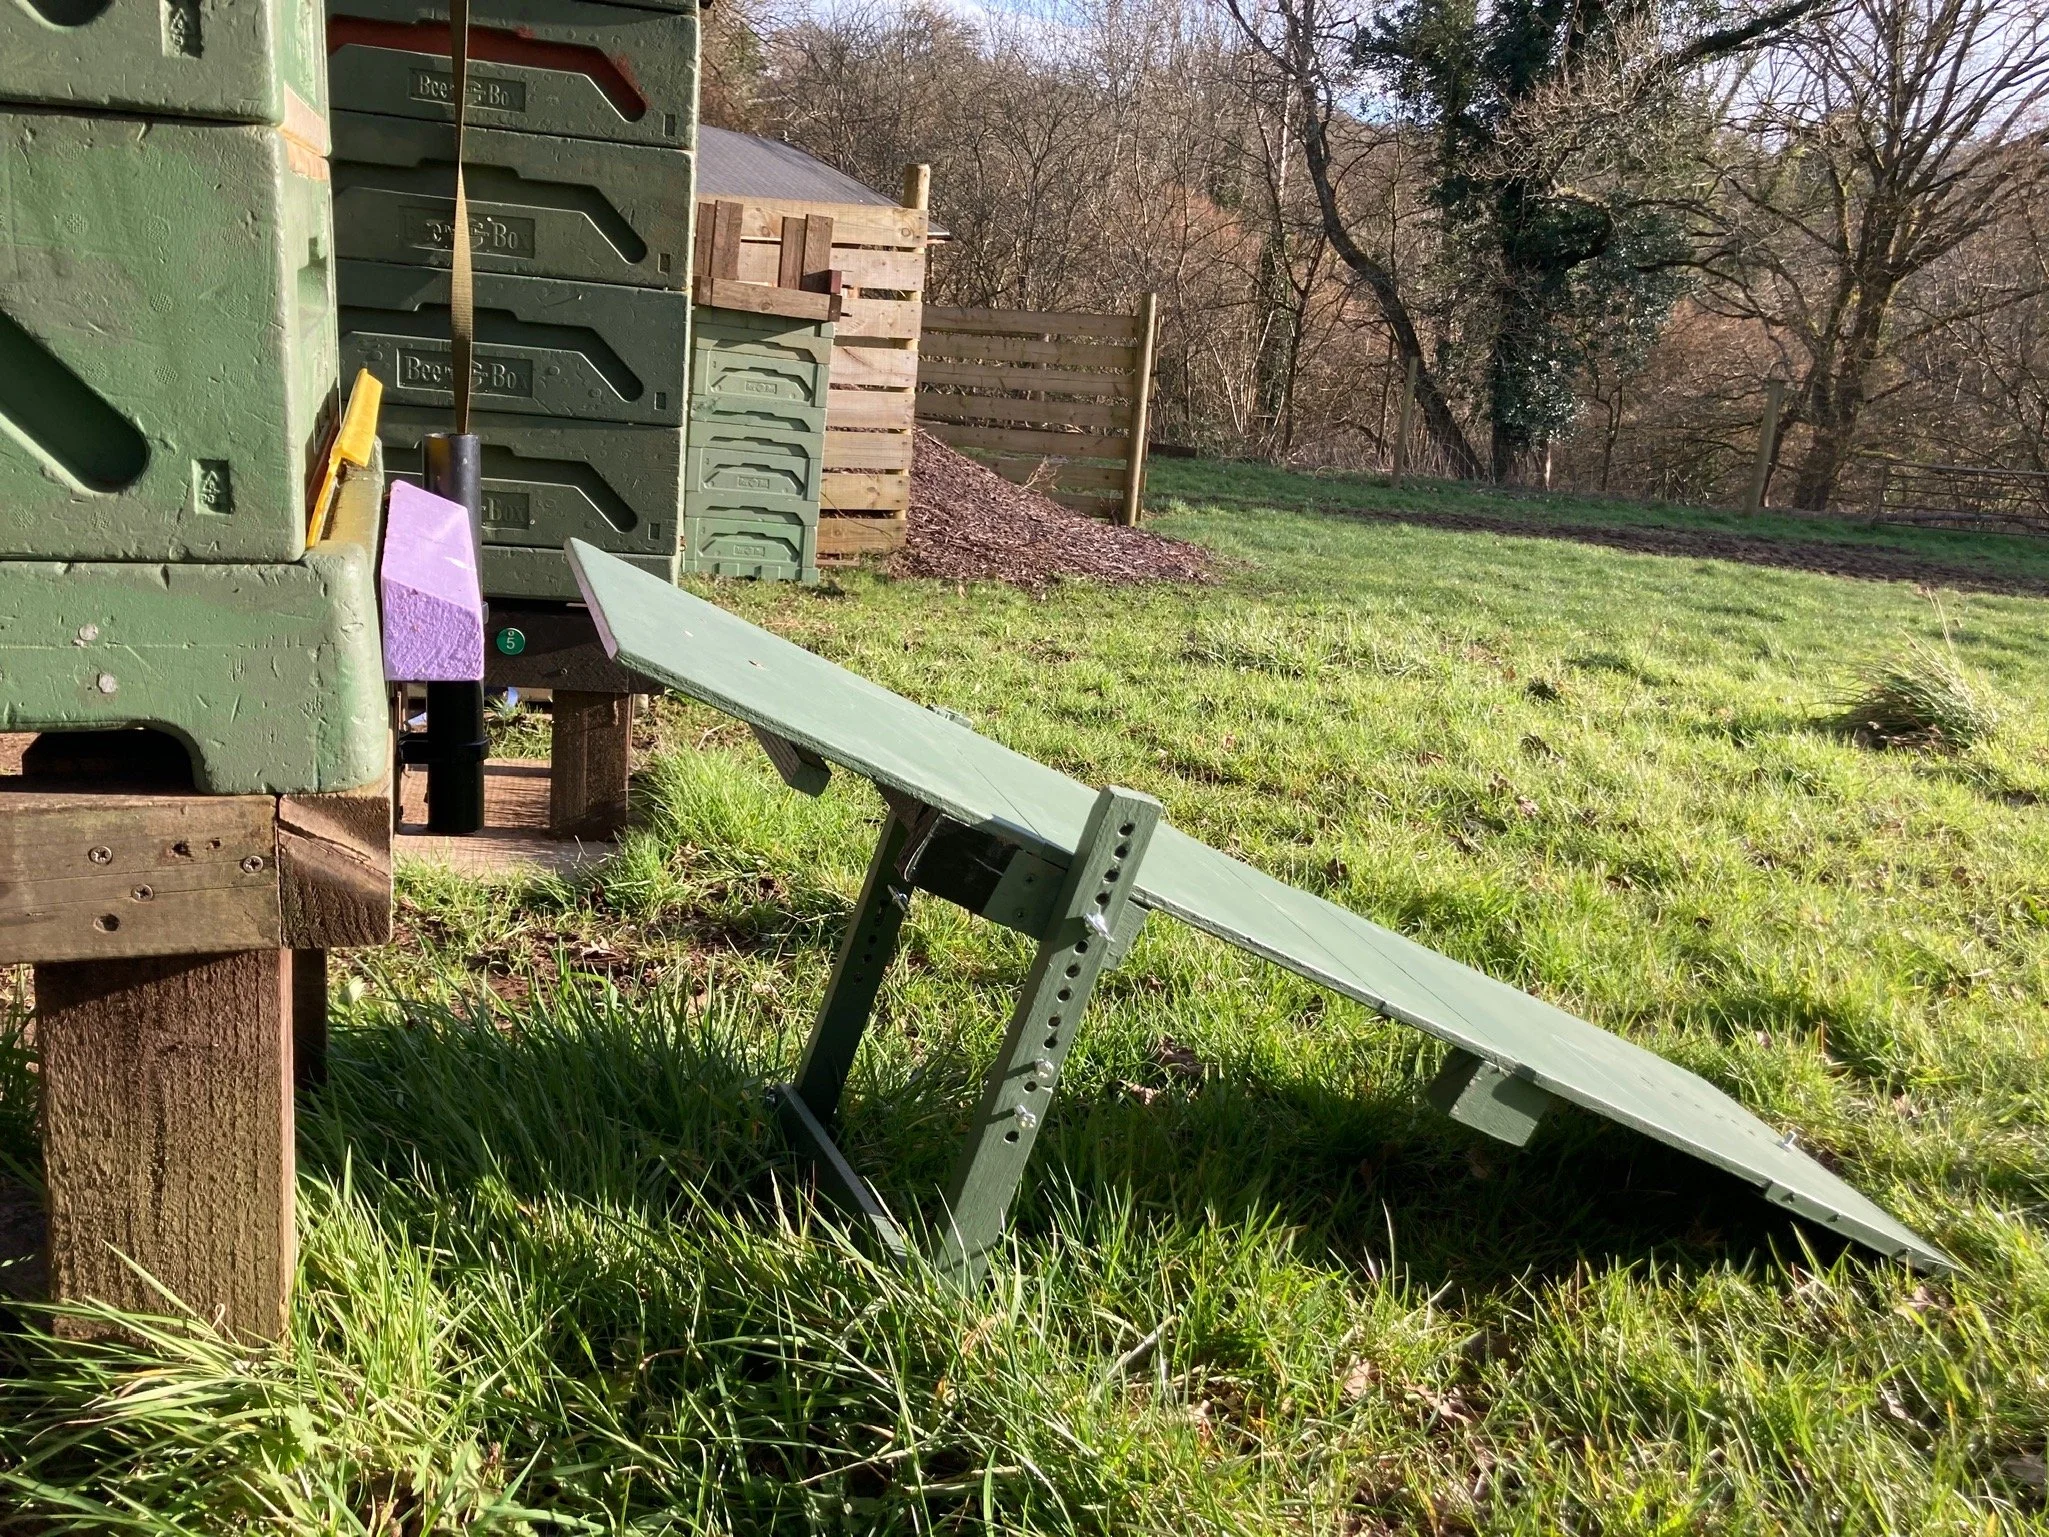
Taranov board
This is an iteration of the Straddle stone method.
Prop a wooden ramp up towards the hive with its tip 10 cm or more from the hive landing board. The entrance must be at least 40 cm off the ground. Taranov suspending the ramp with a rope.
Throw all the bees onto the ramp. The flyers fly over the gap and return to the hive, or nearby hives. The Q and house bees gather under the tip of the board.
Once fully clustered, the queen and the house bees are shaken into a hive or nuc positioned elsewhere in your apiary. Even better, take it to another apiary. In the absence of the queen and young bees, those at the home position should have a reduced desire to swarm. Just to be certain, cull QC in the normal way.
I’ve only tried this once and I failed. The clustered bees sagged to the ground and climbed the stand back into the hive. Look on YouTube and see that other people fail too. Here is a video about throwing bees on the ramp.


Other methods
Horsley board
This is a simple alternative to Snelgrove’s method. It has a complicated door mechanism. Learn more:
Brown’s board
This enables the QE to be revealed without opening the hive, using a thread which dangles around and gets in the way. It is easier to open the hive.
Summary
Swarming: there are QC and the queen is present and there are plenty of bees.
If you can’t find the queen then finding eggs is second best (this is when dark foundation is exceptionally useful - if there are eggs you can find them. With wax foundation, you’re guessing). The rare situation, is when eggs are present with young QC, which makes swarming undisguisable from an emergency.
Swarmed: where have all the bees gone?
Emergency: It is helpful to feel confident that the queen is absent; this is where marking your Qs is valuable. If you find loads of sealed QC and there are plenty of bees, the queen may be about to swarm, but an emergency is more likely.
Supersedure:
There are three QC. However, very rarely there may be four, I’ve even heard five can arise. Bees don’t read the books, and our world is becoming topsy-turvy. However, three or less absolutely indicates supersedure, especially if one QC is on the face of a frame.
To make a little sense of things, refer to a swarm calendar
The easiest swarm control options
Swarm trap: this is particularly useful as you don’t have to find the queen or know whether it is a swarming or emergency scenario. It works well, but it is not mainstream. Whist only available for Langstroth Paradise hives, it is easy to make a simple board with an upper entrance and a 10 cm square central hole, obscured by a QE.
To generate a new queen, you’ll need to do a split or an artificial swarm. A Pagden is popular, but if you miss a QC you're a goner. A Modified Snelgrove Two, is far easier.
A Demaree is suitable in early spring for prevention, it may not be sufficiently powerful in the summer, but, if you can find the queen, it does not cause too much disruption.

Page 7